Onboarding an Azure Subscription
This guide walks you through creating an Azure App Registration with Reader permissions and connecting your Azure subscription to Factor Fifty.
Prerequisites
- Access to the Microsoft Entra admin center or Azure Portal
- Global Administrator or Application Administrator role in your Azure AD tenant
- Global Administrator or Privileged Role Administrator access for Step 4 if you want to enable the Microsoft Graph identity checks
- Owner or User Access Administrator role on the subscription(s) you want to onboard
- A Factor Fifty project to add the environment to
Step 1: Create an App Registration in Azure
Before adding your environment in Factor Fifty, you need to create an App Registration that allows Factor Fifty to read your Azure resources.
Register the Application
- Open the Microsoft Entra admin center
- Navigate to App registrations
- Click + New registration
- Fill in the registration form:
| Field | Value |
|---|---|
| Name | FactorFifty-reader |
| Supported account types | Accounts in this organizational directory only (Single tenant) |
| Redirect URI | Leave empty |
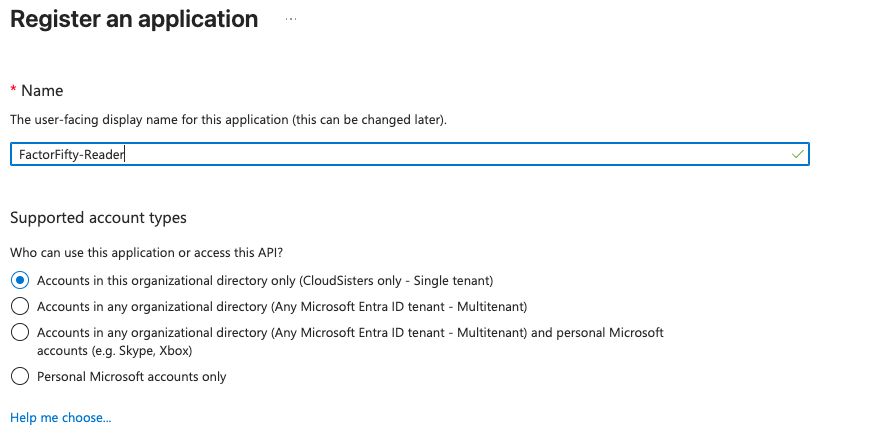
Single tenant is the correct choice as long as all your subscriptions belong to the same Azure AD tenant. A single tenant can contain multiple subscriptions, and the app can access all of them with the appropriate role assignments.
- Click Register
Copy the Application Details
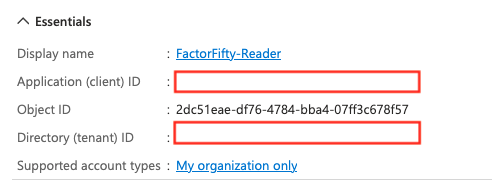
After registration, you'll land on the app's Overview page. Copy and save these values. You'll need them when adding the environment in Factor Fifty:
- Application (client) ID
- Directory (tenant) ID
Step 2: Create a Client Secret
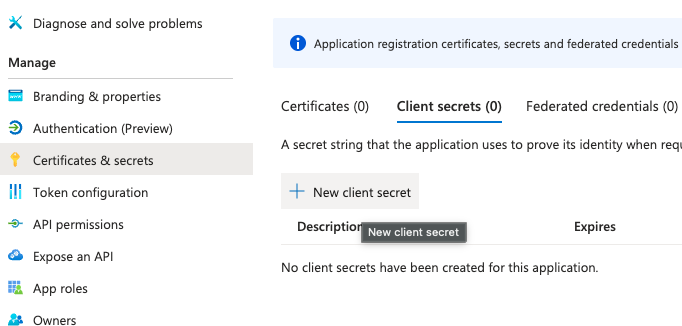
- In your app registration, navigate to Certificates & secrets
- Under Client secrets, click + New client secret
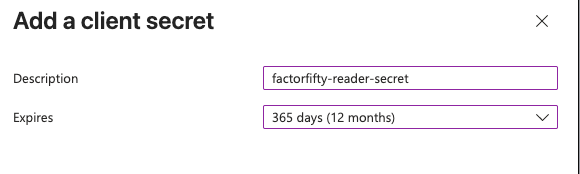
- Enter a description (e.g.,
factorfifty-reader-secret) and select an expiry period - Click Add
Copy the Value of the secret immediately after creation. It will only be shown once, and you won't be able to retrieve it later. Store it securely.

Step 3: Assign the Reader Role on Your Subscription
- In the Azure Portal, navigate to Subscriptions and select the subscription you want to onboard
- Click Access control (IAM) in the left menu
- Click + Add, then Add role assignment
- In the Role tab, search for Reader and select it
- Click Next
- In the Members tab, click + Select members
- Search for your app registration name (
FactorFifty-reader), select it, and click Select - Click Review + assign
After creating the App Registration, wait a few seconds before searching for it in the member selection. Azure AD propagation can take a moment.
Multiple Subscriptions
If you need to onboard multiple subscriptions, you have two options:
| Approach | How |
|---|---|
| Per subscription | Repeat Step 3 for each subscription |
| Management group | Assign the Reader role at the Management Group level to cover all subscriptions under that group |
Additional Read-Only Roles
Depending on which Factor Fifty features you want to enable, you may need to assign additional roles alongside Reader:
| Role | Required for |
|---|---|
| Reader | Base resource visibility |
| Storage Blob Data Reader | FinOps cost export files; assign only on the selected export container |
| Cost Management Reader | Direct budget and optimization features that query Cost Management |
| Security Reader | SecOps Microsoft Defender for Cloud findings |
| Monitoring Reader | Metrics, logs, and alerts |
Assign additional roles using the same process in Step 3. Search for the desired role name instead of "Reader".
For FinOps billing imports, follow Connecting Azure Cost Management. The onboarding script assigns Storage Blob Data Reader to the exact export container. Do not assign this Blob data role at subscription scope.
Step 4: Grant Microsoft Graph API Permissions for Identity Checks
The Reader role covers Azure resources. Identity security checks use Microsoft Graph to read Microsoft Entra ID posture, including MFA registration, Conditional Access, privileged roles, and app credential hygiene.
If someone else manages tenant-wide consent, send them the steps below together with the Application (client) ID and Directory (tenant) ID of FactorFifty-reader. They do not need the client secret. The separate FactorFifty-admin setup is for subscription write access and must not be used for these read-only identity checks.
Skip this step if you only want resource checks. Add these permissions if you want Factor Fifty to run Entra ID identity checks.
Add these Application permissions on Microsoft Graph:
Directory.Read.All: directory roles and members, app registrations, users, and group settingsPolicy.Read.All: Conditional Access policies, named locations, authorization policy, and security defaultsAuditLog.Read.All: MFA registration reportRoleManagement.Read.Directory: Privileged Identity Management (PIM) eligible role assignments
- In your app registration, navigate to API permissions
- Click + Add a permission, then Microsoft Graph, then Application permissions
- Search for and add each of the four permissions listed above
- Click Grant admin consent for
<your tenant>and confirm
Choose Application permissions, not Delegated permissions. Factor Fifty connects as a service, without a signed-in user. The Grant admin consent step requires a Global Administrator or Privileged Role Administrator and must show a green "Granted" check mark next to each permission before the identity checks can run.
Without these permissions the environment still works: all resource checks run with the Reader role alone, and the identity checks will report a clear "missing permission" message instead of results. Two checks additionally depend on tenant licensing: the MFA registration report requires Entra ID P1, and the PIM check requires Entra ID P2.
Step 5: Add the Environment in Factor Fifty
- Navigate to your project in Factor Fifty
- Click Add new environment
- Select Azure as the cloud provider
- Fill in the required fields:
| Field | Description |
|---|---|
| Subscription ID | Your Azure subscription ID (found on the Subscriptions page) |
| Tenant ID | The Directory (tenant) ID from your App Registration overview |
| Client ID | The Application (client) ID from your App Registration overview |
| Client Secret | The secret value you copied in Step 2 |
| Environment name | A friendly name to identify this environment (e.g., "Production", "Development") |
- Click Validate
If validation fails, wait a few seconds and try again. Role assignments in Azure can take up to 30 seconds to propagate.
Alternative: CLI Setup
If you prefer using the Azure CLI, you can complete the Azure-side setup with the following commands:
# Login to Azure
az login

# Step 1: Create the App Registration
az ad app create --display-name "FactorFifty-reader"
# Note the appId from the output

# Step 2: Create the Service Principal
az ad sp create --id <appId>

# Step 3: Create a Client Secret
az ad app credential reset \
  --id <appId> \
  --append \
  --display-name "factorfifty-reader-secret" \
  --years 1
# Save the appId, password, and tenant from the output

# Step 4: Assign the Reader role
az role assignment create \
  --assignee <appId> \
  --role "Reader" \
  --scope "/subscriptions/<subscription-id>"

# Optional: Assign additional read-only roles
az role assignment create \
  --assignee <appId> \
  --role "Cost Management Reader" \
  --scope "/subscriptions/<subscription-id>"

# Step 5: Add the Microsoft Graph API permissions
# (Microsoft Graph API = 00000003-0000-0000-c000-000000000000)
az ad app permission add --id <appId> \
  --api 00000003-0000-0000-c000-000000000000 \
  --api-permissions \
    7ab1d382-f21e-4acd-a863-ba3e13f7da61=Role \
    246dd0d5-5bd0-4def-940b-0421030a5b68=Role \
    b0afded3-3588-46d8-8b3d-9842eff778da=Role \
    483bed4a-2ad3-4361-a73b-c83ccdbdc53c=Role

# Step 6: Grant admin consent (requires Global Administrator or Privileged Role Administrator)
az ad app permission admin-consent --id <appId>
The permission IDs in Step 5 correspond to:
Directory.Read.All:7ab1d382-f21e-4acd-a863-ba3e13f7da61Policy.Read.All:246dd0d5-5bd0-4def-940b-0421030a5b68AuditLog.Read.All:b0afded3-3588-46d8-8b3d-9842eff778daRoleManagement.Read.Directory:483bed4a-2ad3-4361-a73b-c83ccdbdc53c
Store the credentials securely. The client secret is only shown once during creation.
Verify the Setup
# Login as the service principal
az login --service-principal \
  -u <appId> \
  -p <client-secret> \
  --tenant <tenant-id>

# Verify you can list resources
az resource list --subscription <subscription-id> --output table

# Verify role assignments
az role assignment list \
  --assignee <appId> \
  --subscription <subscription-id> \
  --output table

# Verify the Graph permissions were granted (admin consent)
az ad app permission list-grants --id <appId> --output table
Troubleshooting
Validation Failed
If validation fails in Factor Fifty, check the following:
- Verify the Subscription ID: Ensure the subscription ID is correct
- Check the Client ID and Tenant ID: Confirm they match the values on the App Registration overview page
- Verify the Client Secret: Ensure you copied the secret Value, not the Secret ID
- Wait for propagation: Role assignments can take up to 30 seconds to propagate. Wait a moment and try again
- Check the role assignment: Navigate to the subscription's Access control (IAM), then Role assignments, and confirm the app is listed with the Reader role
Permission Errors
If you receive permission errors after onboarding:
- Verify the Reader role (and any additional roles) are assigned on the correct subscription
- Check that the client secret has not expired
- Ensure the App Registration has not been deleted or modified
- For FinOps export imports, verify Storage Blob Data Reader is assigned on the exact export container. Cost Management Reader alone cannot read Blob contents
Identity Checks Report "Insufficient privileges" or "Missing permission"
If resource checks work but the Entra ID identity checks report errors such as Authorization_RequestDenied or a missing Graph permission:
- Open the App Registration, then API permissions, and confirm all four Microsoft Graph permissions from Step 4 are listed as Application type (not Delegated)
- Confirm each permission shows a green Granted for
<tenant>check mark. Adding a permission without granting admin consent is the most common cause - Admin consent can take a few minutes to propagate to newly issued tokens. Wait and rescan
- If the error mentions a license: the MFA registration report requires Entra ID P1 and the PIM check requires Entra ID P2 on the tenant. These two checks cannot return results without the license; all other checks are unaffected
App Registration Not Found in Member Search
If the App Registration doesn't appear when searching for members in Step 3:
- Ensure you completed both the App Registration and the Service Principal creation (the CLI creates these separately)
- Wait a few minutes for Azure AD to propagate the new identity
- Try searching by the Application (client) ID instead of the display name